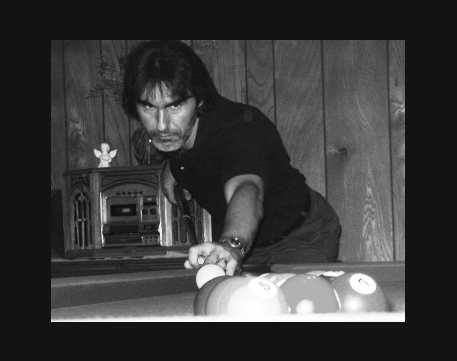
Professional Pool Player, Instructor, Author
Currently residing in El Paso, Texas
He originally hails from:
Live Oak
Orlando
Florida
USA
E-mail: blkjackds12@yahoo.com
9 September 2006
The second of a series of articles from instructor and author "Blackjack" David Sapolis.
This excerpt, from his latest book, "Lessons in 9 Ball" is reprinted here with permission.
Contact David directly for details of how to purchase his books.
Factors of Proper Execution
The safety is one of the most complex subjects in 9 ball. If you lack the ability to properly execute safeties, your game will surely suffer.
Many beginners fail to recognize the safety option, and tend to go for the shot at all costs in all situations. Just as there are factors to running the rack, there are factors that come up when you are faced with no shot options.
When faced with no option to pocket the object ball, we need an alternate solution that gives the table back to our opponent - but at the same time limits his options.
Click on "Read More..." for the details.
The factors that surround the execution of the safety are:
Table Speed
The Layout
Your Ability To Remain Calm when faced with less than desirable situations.
Table Speed
To properly send the balls to the desired locations, you need to know how the cloth is reacting to the surroundings and your stroke. Prior to starting the match, ensure that you check the cloth speed. Many tables play fast in dry heat in areas of the Southwest, but tables are sticky in the Southeastern States such as Louisiana and Florida due to the humiditys effect on the cloth. Rails react differently in different weather also. In areas of the North and Northeast, I believe the table speed is more predictable due to the absence of humidity and dryness. Though many rooms attempt to protect the playing area with different climate control methods, I believe that areas such as Florida will always pose a special challenge due to the factors that the table conditions throw at the player.
When dealing with safeties, we need to gage the table speed for two important reasons:
1) We need to place the cue ball or object ball EXACTLY where it needs to be placed
2) We need to know how we are going to get there
It is one thing to know how and where the ball is going, but we also need to properly execute it. Testing a few multi-rail position shots prior to the match, or performing basic patterns and drills should give you a basic understanding or how the table is reacting. Understand that when playing pool at the top level, you need to have a good working relationship with the table you are playing upon. Understand how the table surface is performing and reacting, learn the speed of the rails, the cloth, and the pockets. Inspect the table for divots and settling around the racking area. Knowing the table is essential to winning any pool game.
Layout
When executing a safety, it is essential to inspect the layout of the table in relation to what you are going to do. Walls and clusters are obvious targets to send the cue ball or the object ball, but certain factors will determine which of the two you will send there. To determine which, we look at what the problem is in the situation we are faced with. Here are some questions we should ask when faced with the decision to play safe:
Am I faced with a positional dilemma?
Am I faced with a difficult shot dilemma?
Did I get in the wrong side of the ball?
Am I hooked?
Is the ball I am facing hidden?
Does the object ball have no pocket options?
Identifying the problem is the FIRST STEP in finding a solution to the problem.
Your Ability To Remain Calm
Many players get flustered at the first sign of trouble. To be able to make sound, sensible decisions that aid us in our quest, we need to remain calm when faced with adverse conditions at the table. Your ability to remain calm will reflect in your decision-making and the execution of your safety. If you are angry, flustered or nervous, your chances of being successful are extremely limited. Safeties are not only tools to use on your way towards the winners circle; they are also tools of frustration. You can either let the situation frustrate you, or you can use the situation to frustrate your opponent. Dwelling on helplessness solves nothing. Getting angry and reacting to the situation emotionally (as opposed to effectively) exposes a weakness to your opponent. Learn how not to react emotionally and learn how to react effectively. Answer every shot with a shot of your own. Never answer his shot with an emotional outburst. Controlling your emotions and remaining calm throughout the situation will help you think more clearly throughout the game and the match.
When To Play Safe
Knowing when and when not to play safe is half of the battle. Many players play safe in different situations and what they do depends on their skill level, their shotmaking ability, and their confidence. As I touched upon earlier, many younger players tend to go for everything and rarely play safe - and when they DO play safe - they execute it poorly. Familiarizing yourself with the different factors of when and when not to play safe is essential to making the proper choice.
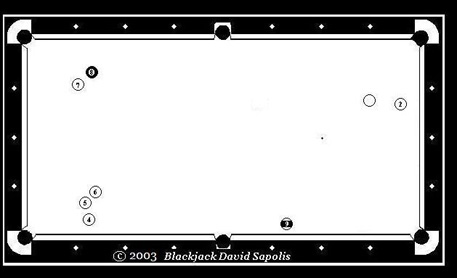
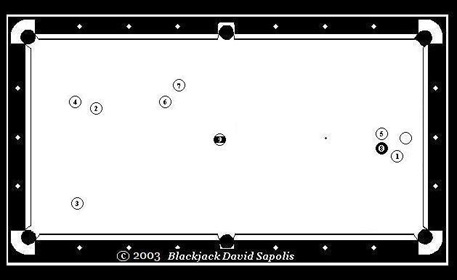
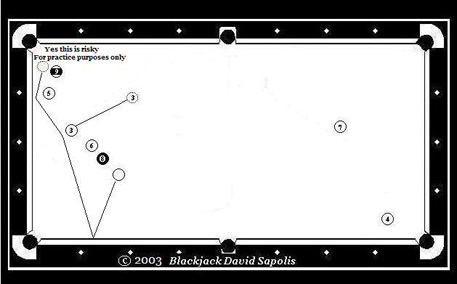
One of the classic examples is after the break. Your opponent has broken the balls and has left you no shot on the 2 ball as a result of pushing out. The 2 ball is stranded on the end rail. There is a very low percentage bank shot on the 2 ball cross-table. (SEE DIAGRAM BELOW)
That is the only pocket availability option that we have on the 2 ball - and even then - we need some help from the 8 ball. There is also a cluster caused by the 4, 5, & 6. There is a mini-cluster caused by the 7 and the 8. We have the choice to:
a) Go for the bank shot
b) Pass the shot back to our opponent
c) Control the cue ball and place it behind a cluster
d) Control the object ball and place it behind a cluster
So what is the correct choice? Lets break it down by looking at each available option and make our decisions by choosing the shot that holds the best percentages for success. We will first Identify whether or not there is a good chance for a run out. To do this, we must imagine that we have ball in hand on the 2 ball. We look to see if any ball is in trouble. The 5 ball causes a problem, but if we get right on the 4 ball and stay on the lower rail, the 5 ball goes in the top left corner pocket. The key to running this rack is getting straight on the 4 ball for a stop shot so that we can pocket the 5 ball. With the 5 ball gone, the 6 ball is a duck in 4 out of 6 pockets. The 7 and 8 are a mini-cluster, but both pass into the top left corner pocket very easily. Evaluating this layout tells me two important things:
1) There is a possibility for a run out
2) Whoever maintains control of the game CAN and WILL get out
3) My opponent should have played safe instead of rolling out - HE just made an error
4) I am in control of the table now and I need to make it count - and MAINTAIN control
Notice that I mentioned maintaining control. By that I mean that we need to be the actor as opposed to being the reactor during this game. He has pushed out and left us a lousy shot on the 2 ball. We can hit the 2 ball, and we have two separate safety options caused by a three ball cluster and a two ball mini-cluster. The 7 and 8 balls are more of an obstacle option than a cluster as the balls can be pocketed from where they are. The 4-5-6, though classified as a cluster, can be dealt with if handled with care. The 4-5-6 is also our largest obstacle on the table.
Do we bank the 2 ball?
Pocketing the 2 ball by banking it cross table relies on many factors. We first have to determine whether or not the 2 passes by the 8ball. We can obviously see that it will not pass by the 4 ball. The 2 does pass by the 8 ball, so we must now look at the position we will need to make the 4 ball. The bank on the 2 ball will send our cue ball to the bottom rail, then the side rail, and out towards the center of the table. This will be unavoidable, as we will have to surrender the cue ball to the elements of the table due to the angel we have on this bank shot. That is unavoidable. This will leave us too much angle on the 4 ball, thereby eliminating an easy shot on the 5 ball. Already we can see the chances of a run out slipping away. By evaluating this option, we have determined that there are too many problems ahead of us if we take this option - therefore it should be avoided.
Do we pass the shot back to our opponent?
What if he has discovered the safety option as well? Im not going to hand it back to him on a silver platter. He just made a tactical error and I should make him pay for it - dearly. We can eliminate this option as well.
This leads us to a crossroads that we come to with each safety option. We can either control the cue ball or the object. Always choose one or the other and avoid controlling both at the same time.
By our evaluation, we can see two walls. We should look at the LARGEST obstacle and see what our options are.
Can we successfully place the 2 ball behind the 4-5-6? Not very likely. From where we are, we can place it in front of the 4-5-6 cluster - which DOES cause problems - but that is not the wisest choice. Why? Because if the 2 ball is placed in front of the 4-5-6 cluster it can be used as the lead combination ball. If we do not execute it properly we can leave the 2 ball in front of that corner pocket. Fro there he will be able to use the 2 ball quite easily to break up that cluster with the ensuing cue ball action. We could also tie up the 2, (or tie up the other balls) and inherit that problem somewhere down the road. Eliminate that option as well.
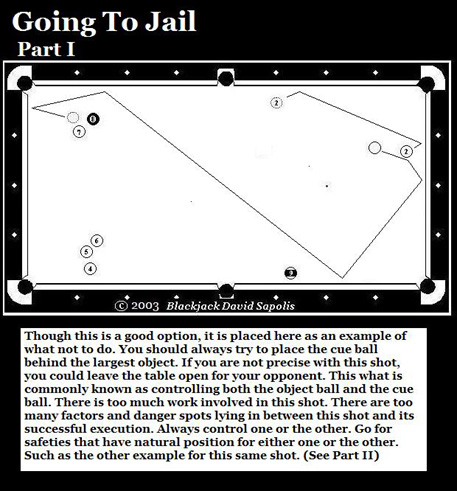
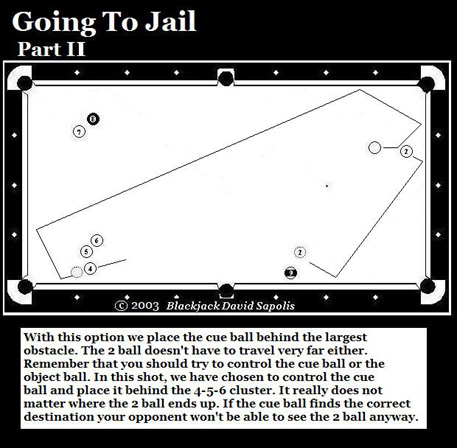
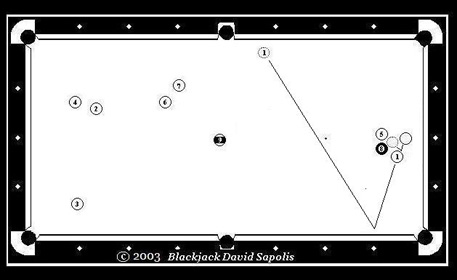
Now lets look at the shot that is illustrated.
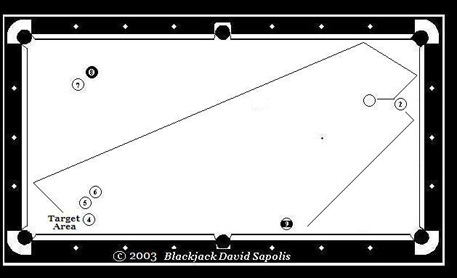
It is a safety that is executed quite easily and it is a high percentage shot. Also, if we are unsuccessful, we have our opponent shooting AWAY from the required position on the 4 ball. The rule I follow in this situation is to have him shooting AWAY from the straight position that is required on the 4 ball. Unless he gets this position, he will not have a good shot on the 5 ball. This means that he should be shooting towards the upper pockets and the pockets on the right (in the diagram). Even if our execution varies slightly from the illustration, the 2 ball becomes a locking mechanism rather than the key that opens up the rack for our opponent. Even if the 2 ball is behind the 9 ball and he can make it - his chances will be slim as long as he is you have his natural cue ball position going away from the 4 as he pockets the 2 ball.
This situation occurs very frequently during safety battles. As long as your opponent is shooting away the required position YOU remain in control of the situation as the actor, not the reactor. If we lock our opponent up behind the cluster, he will be forced to kick 2-3 rails to make contact with the 2 ball. Ensuring that the cue ball gets close to the cluster, you will have taken away the jump shot from his options. By simply evaluating all of our options, we have eliminated the poor choices and identified their disadvantages and subsequently identified the percentage option and all of its advantages. Why not go behind the 7 and the 8? This is explained later on in the diagram entitled Going To Jail where we will revisit this shot and evaluate it again.
During this shot, we evaluated the situation and into consideration everything that could go right and wrong with every option that we had. Never eliminate an option before weighing the advantages and disadvantages carefully. Weigh each option carefully and as time goes by you will amass a large inventory of knowledge and experience that will aid you in your future endeavors. Many situations revisit us from time to time. Though no two layouts are exactly the same, there are situations that are similar. The more experienced you are at thinking things through, the more apt you will become to making the correct choice when faced with difficult situations.
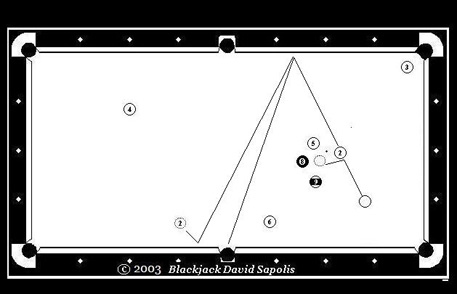
Offensive Safeties
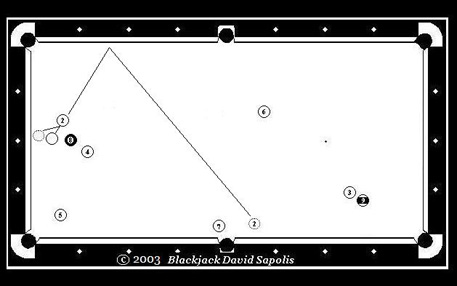
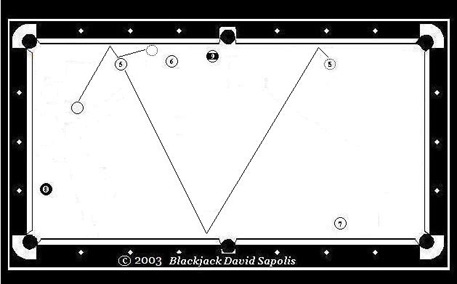
Offensive Safeties are shots that hide the cue ball or object ball from your opponent while at the same time giving you an advantage on the resulting ball in hand. In this situation, we have no shot on the 2 ball. When we look at the table, we see that the 3-9 combination is sitting pretty up in the corner. If we allow our opponent to see the 2 ball, it is a safe bet that we will lose this game.
The shot illustrated shows an offensive safety. We are hiding the cue ball behind the 8 and 4. With the proper stroke, we send the 2 ball in front of the 7 ball. Where the 2 ball ends up is not as important as hiding the cue ball - therefore we control the cue ball - not the 2 ball. The resulting ball in hand leaves you in very good position to win this game.
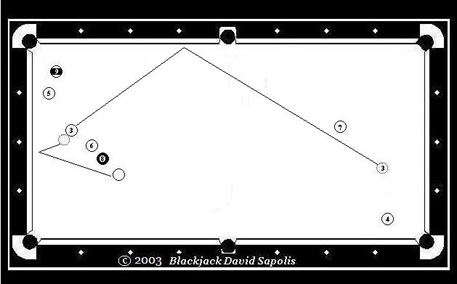
Defensive Safeties
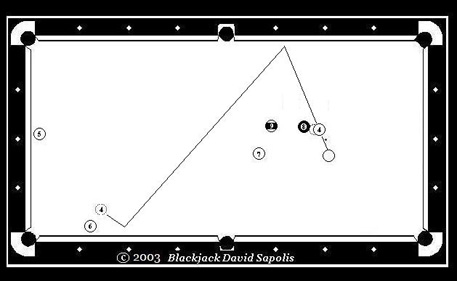
For whatever reason, you have gotten this shape on the 4 ball. The 7 ball is blocking the cross side option, and from where your cue ball is, you have no pocket availability options for the 4 ball. The key here is to hide the cue ball only. This is a defensive move that opens up an offensive option.
We have hidden the cue ball behind the 8 ball. Even if our opponent makes contact with the 4 ball he will be sending it towards a pocket (off of Rail A). If he chooses to go to Rail B, he will have the 8 ball as an obstacle and he will be shooting at it awkwardly. In this situation you have limited his offensive options. When looking for a place to send either the object ball or the cue ball, always look to send either to a location that offers your opponent the fewest offensive options. Limit his options and increase yours. This shot also opens up the table - for YOU!
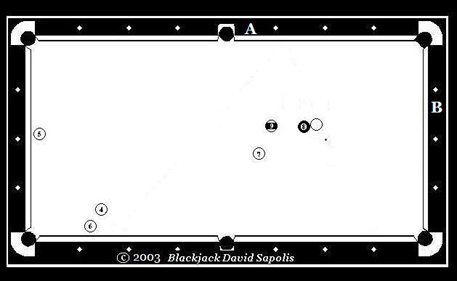
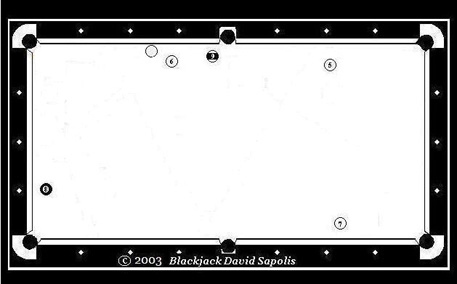
Duck or Hide?
What do you do here? Look at this situation carefully. It is possible to make the 1 ball into pocket A. Do we have anything to gain from that? Not really. Well just break up the 5 and 8. We can also try to bank the 1 ball cross-side, but once again, the position on the 2 ball leaves a lot to be desired. If we stick the cue ball behind the 8 and 5, chances are we will have nothing to gain by getting ball in hand - seeing we have two sets of clusters. So what do you do?
This is a hide shot. Simply hide the cue ball behind the 5 and 8. Even though you do not have much to gain by getting ball in hand, you remain in control. You can try to lock him up again on your next shot. That way you keep him kicking at the 1 ball.
Two Way Shot
This is an example of a two way shot. In this situation, we can attempt to pocket the 2 ball cross side. If we make the 2 ball we still have position on the 3 ball. If we miss the bank on the 2 ball, we have hidden our opponent (as diagrammed below).
Kick Safeties
There are a couple of ways to hit this shot. Above, we hit the 3 ball full and send it one rail between the 7 and 4 balls. This will leave the cue ball behind the wall made by the 6 ball and the 8 ball. Below, We come one rail, hitting the 3 ball one rail and out of the way. This will hide the cue ball behind the 5-9 cluster.
Kick Safeties
In this shot we do not have the proper angle to bank the 5 ball cross side. By using this kick safety, we open up the table while at the same time making life miserable for our opponent.
Taking The Jump Shot Out of The Equation
When executing a safety where you are controlling the cue ball, it is important to find traps where our opponents options are limited. Below is an example of good cue ball placement. It is extremely important to take the jump shot out of the equation if at all possible.
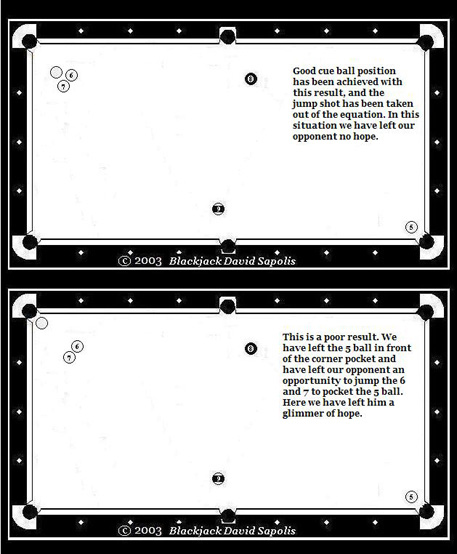
Taking the jump shot out of the equation is one thing, but taking all hope for survival out of the equation is the ultimate goal. If there is one area of the game where we can find our opponents weakness, it is with a good safety battle. If I am able to lock him/her up, and he/she misses a one rail kick attempt, then I have detected a weakness. Armed with that information, I will have my opponent revisit that nightmare over and over, as often as I possibly can. This can also be a weapon for your next match up with this opponent, or a way to test him to see if he has strengthened that area of his game.
If there is one thing that I cannot stress enough about safety battles, it is to remember what works and what does not work. I would not leave Efren Reyes an easy one rail kick with the object ball sitting in front of the pocket. There is probably a 99.999% chance that he will not feel the least bit threatened at my weak attempt at locking him up. When I am playing safe, I want my opponent to know that I mean business. Its nothing personal. I want to either run racks, or when faced with no shot - I want to leave him absolutely no daylight whatsoever. I always want to execute a safety with killer instinct. Passive, weak, desperate, or timid safeties will possibly give control of the table back to my opponent.
Remember that we always want to remain in control and be the actor, not the reactor. You can do this by not only leaving hi shot-lee, but option-less as well. The less options he has, the more helpless he will feel. This can work both ways. If you are the guy that is locked up, do whatever you have to in order to regain the advantage. If you cannot see the object ball, do everything in your power to at least make contact with it legally. Even if you leave him a straight in shot, it is much better than giving your opponent ball in hand. Above all else, choose your battles carefully. Do not play safe unless you absolutely have to. Weigh your options and play the percentages. Be a smart player as opposed to being a bold player. Apply what has been learned in this book, and you will start winning games that you could not win before.